Jan. 30, 2025, 6 a.m.
Replacing ISP ONT with our own hardware!
Replacing ISP ONT (Router/modem) with our own! Part 1: Converge FiberX
Declassification date: 1/30/2025
Disclaimer: For educational purposes only, I am not liable if you mess up your ISP’s fiber network or any other legal stuffs.
Some links may help me earn commissions.
Introduction
A long time ago, I planned to replace my ISP-provided fiber modem/router (HUAWEI EG8145V5), this is because of the following:
- Because we can! - also a challenge!
- Cheap hardware; - Better performance if we use our own, replacing the lowest bid ISP equipment.
- Security reasons - They are not updated regularly/at all, also (*cough, HUAWEI/ZTE/fiberhome are major CPE devices used by ISP in the Philippines)
- Remotely managed by ISP - “backdoor.” (always use a firewall behind the ISP CPE device)
- Space saving! - After this guide, you’ll save some space!
But I held it off for not having funds and time, but since it was holidays, I got some funds and time off, with the help of . from the Backspace Discord community. They have recommended the ODI DFP-34X-2C2 SFP XPON Module and another stick to bypass the CPE equipment.
Immediately, I ordered the ODI (from China) and a 2.5G media converter from a shop in Vietnam, although you may use any SFP-capable switch if you have one. It all arrived in good condition, including the SC APC to SC UPC Fiber Optic Cable from a domestic seller.
Here are the devices I used, including the shop link (they are not my shop):
Full list of requirements:
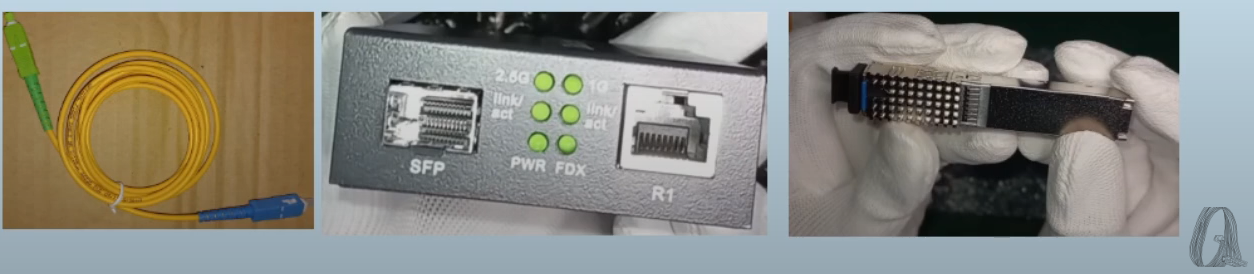
- ODI DFP-34X-2C2 SFP XPON Stick (UPC): https://s.shopee.ph/5fZ3ly4VhQ
- ODI DFP-34X-2C3 SFP XPON Stick: same link above (this has APC connector)
- SC APC to SC UPC FOC Patch Cable: (You may also need APC or UPC Couplers? if there are no fiber box inside your home) https://s.shopee.ph/6AVKMmaETY
- 2.5G SFP Media Converter or other switch: https://s.shopee.ph/9A8vwShSTZ
- Ethernet cable (CAT5/6)
- PC or Laptop with ethernet port
- Your third party router (ex. OpenWRT Linksys EA8300 or a VM with OpnSense)
Before I proceed, just some Terminologies used:
ISP - Internet Service Provider (PLDT/Globe/Converge)
FTTH - Fiber to the Home
CPE - Customer Premises Equipment (Huawei EG8145V5 etc.)
ONT/ONU - Optical Network Terminal/Optical Network Unit (All-in-one-modem-WiFi-Router/Optical modem)
SFP - Small Form-factor Pluggable
OLT - Optical Line Terminal
OMCI - ONU management and control interface
PON - Passive Optical Network
GPON - Gigabit Passive Optical Network
XPON - multi-mode PON
SC - Subscriber Connector
APC - Angled Physical Contact (Green) - used by Globe/GOMO/Converge
UPC - Ultra Physical Contact (Blue) - used by PLDT
ODI/HSGQ - Shenzhen HS Fiber Communication Equipment CO., LTD. manufacturer of the SFP ONU we used in the video
RTL960x - the Realtek chip that powers the SFP Module in this video
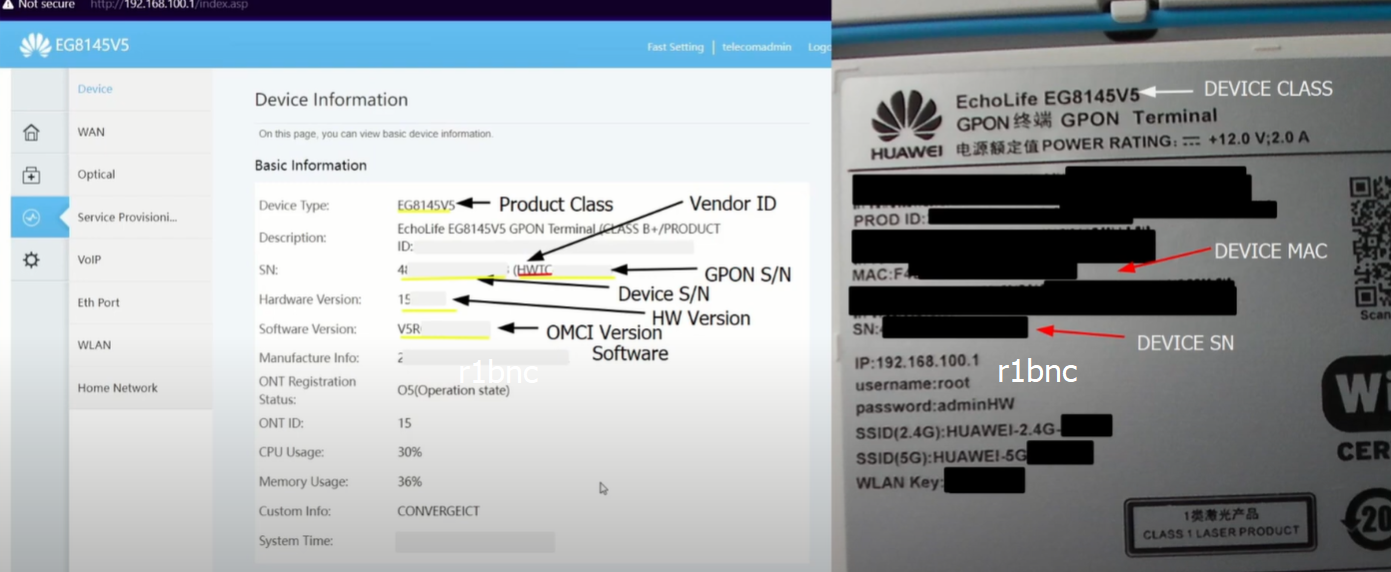
Dumping our ISP ONT information
The plan is to clone the details from our ISP ONT to the ODI SFP Module, this means cloning the GPON S/N, MAC Address, Device Class, etc. (Making the ISP think that we are still using their provided modem-router).
For my test ISP, we will be using Converge ICT’s FiberX which is authenticated via GPON Serial Number, the same can be said for Globe. But for PLDT they require extra steps, and I don’t have a PLDT Fiber subscription to test at this time.
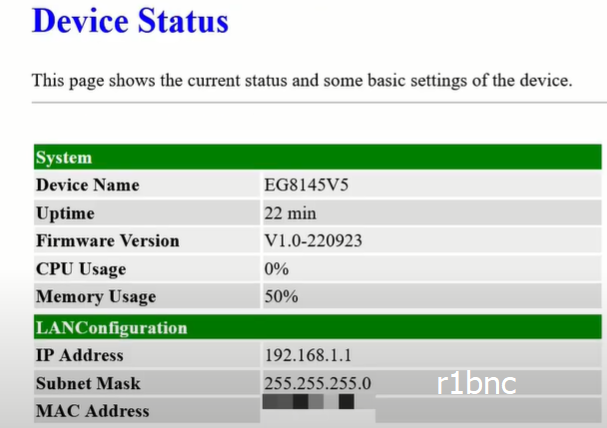
To get the details of our ONT, login to the admin page at **http://192.168.100.1** for Converge router.
If you cannot login to the dashboard, you can join Backspace discord and view the list of superadmin credentials for all PH ISPs.
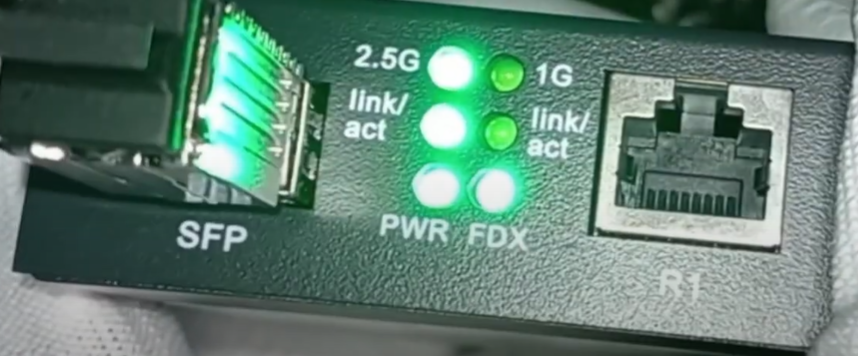
The SFP XPON Module
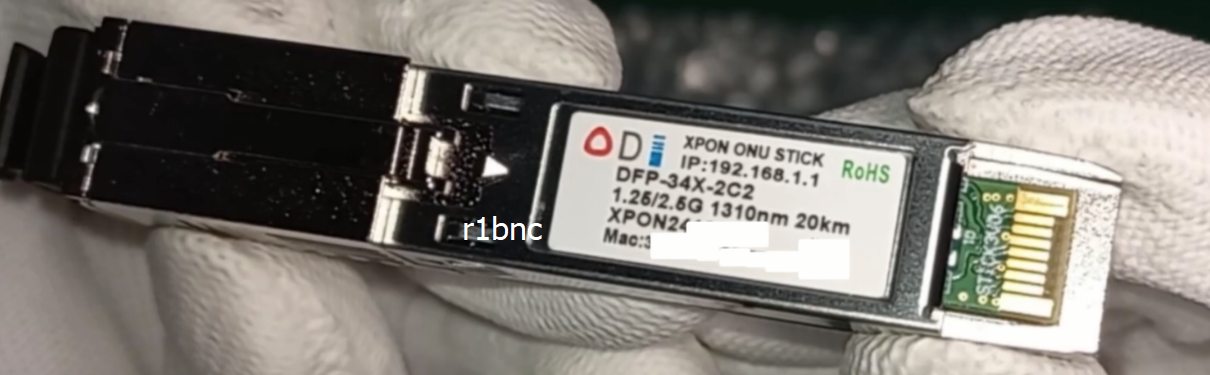
The photo above is of the ODI stick.
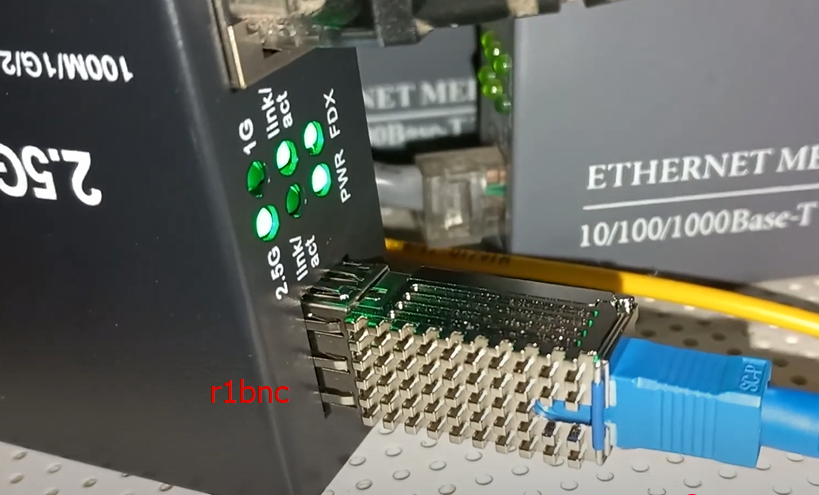
To configure it we have to plug it into the media converter. The 2.5G media converter I have can be powered from 5V to 12V and comes with a cheap 5.5x2.1mm DC plug AC-DC 12V power supply.
Plug in your media converter’s LAN to your PC or Laptop ethernet port. Do not plug in the fiber cable yet.
We need to set static IP in order for us to configure it. Go to Control Panel - Network -> Ethernet - Properties. Edit the Internet Protocol version 4, select ‘Use the following IP Address‘ and input the detail on the screenshot below:
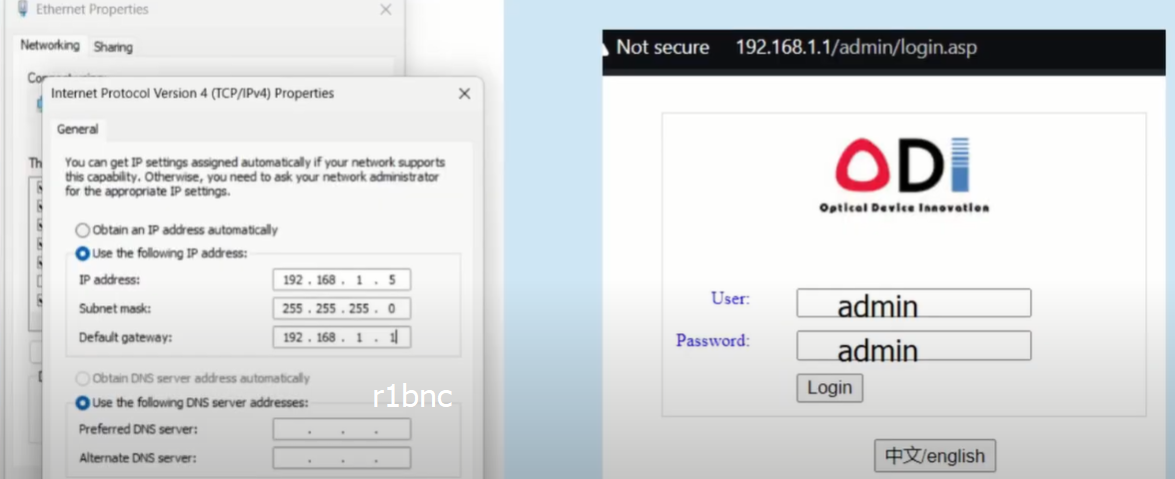
Visit http://192.168.1.1** and login using username and password admin** to login to the web dashboard, note that you can also login to our ODI stick using SSH (port 22) and Telnet (port 23) via PuTTY.
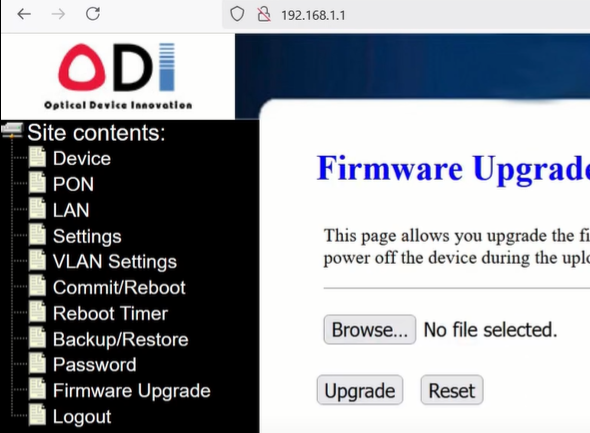
Here is the default web dashboard of our SFP XPON stick:

Upgrading Firmware
Before we proceed in configuration, we have to download backup configuration and update the firmware of our stick.
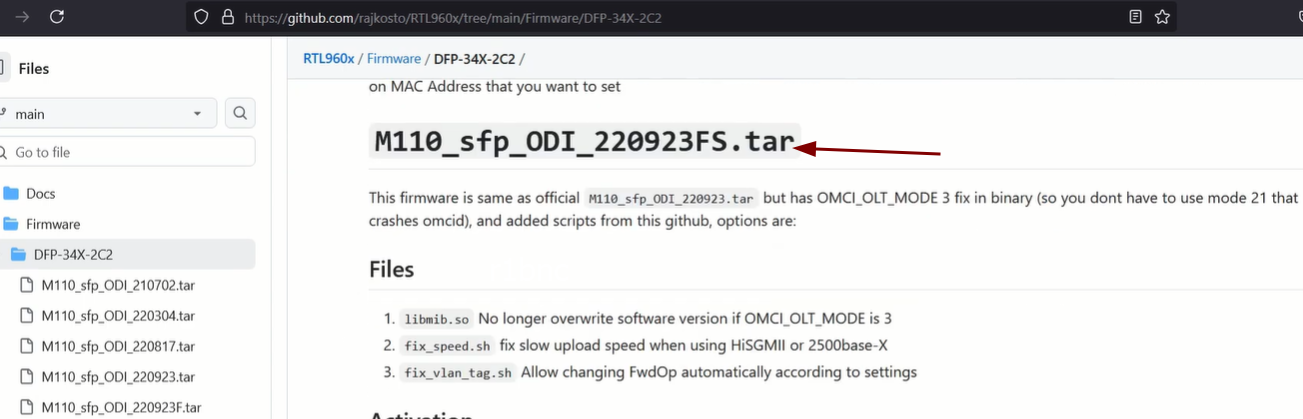
Download the firmware from this link (external link): **https://github.com/rajkosto/RTL960x/tree/main/Firmware/DFP-34X-2C2**
I use this firmware, M110_sfp_ODI_220923FS.tar
The stock firmware that came with the stick has issues with cloning some details. Here are the changelog for the fixed firmware:
This firmware is same as official M110_sfp_ODI_220923.tar but has OMCI_OLT_MODE 3 fix in binary (so you dont have to use mode 21 that crashes omcid), and added scripts from this github, options are:
Files
libmib.so No longer overwrite software version if OMCI_OLT_MODE is 3
fix_speed.sh fix slow upload speed when using HiSGMII or 2500base-X
fix_vlan_tag.sh Allow changing FwdOp automatically according to settings
To proceed with updating firmware, just download the M110_sfp_ODI_220923FS.tar file, upload it via the web dashboard, and restart the ODI device. You have to repeat this twice to overwrite the backup partition image on our stick.
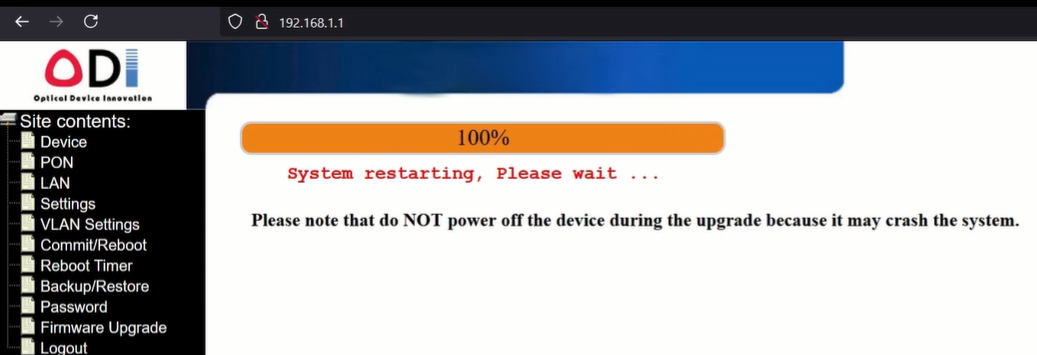
If you encounter some issue after the upgrade, you might need to factory reset the stick:
It will remove your MAC address and MAC_KEY; be sure to save that first!
Login via Telnet or SSH and execute the following; it will erase all data from partition mtd3 and restart the device:
flash_eraseall /dev/mtd3
reboot
ISP CPE Bypass Configuration
We are now ready to configure the ODI stick and replace our ISP CPE provided ONT!
Going back to our ISP provided ONT, we have to copy the following details:
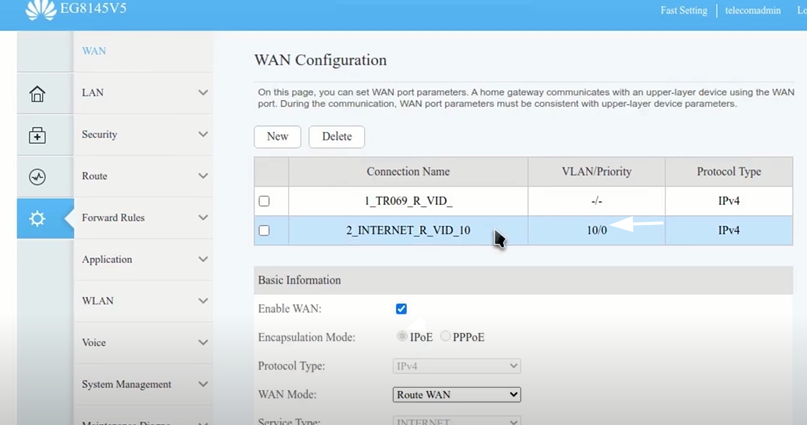
You also need to note the VLAN ID from the ONT; in my case, it is VLAN 10.
Navigate to the PON setting of our ODI stick and paste the values from our ISP ONT:
NOTE: For Converge/Globe/GOMO, we only needed the GPON SN to be set in order to authenticate (O5 status) to OLT and have internet; we just copied the other details to make it seem that we are still using the ISP equipment.
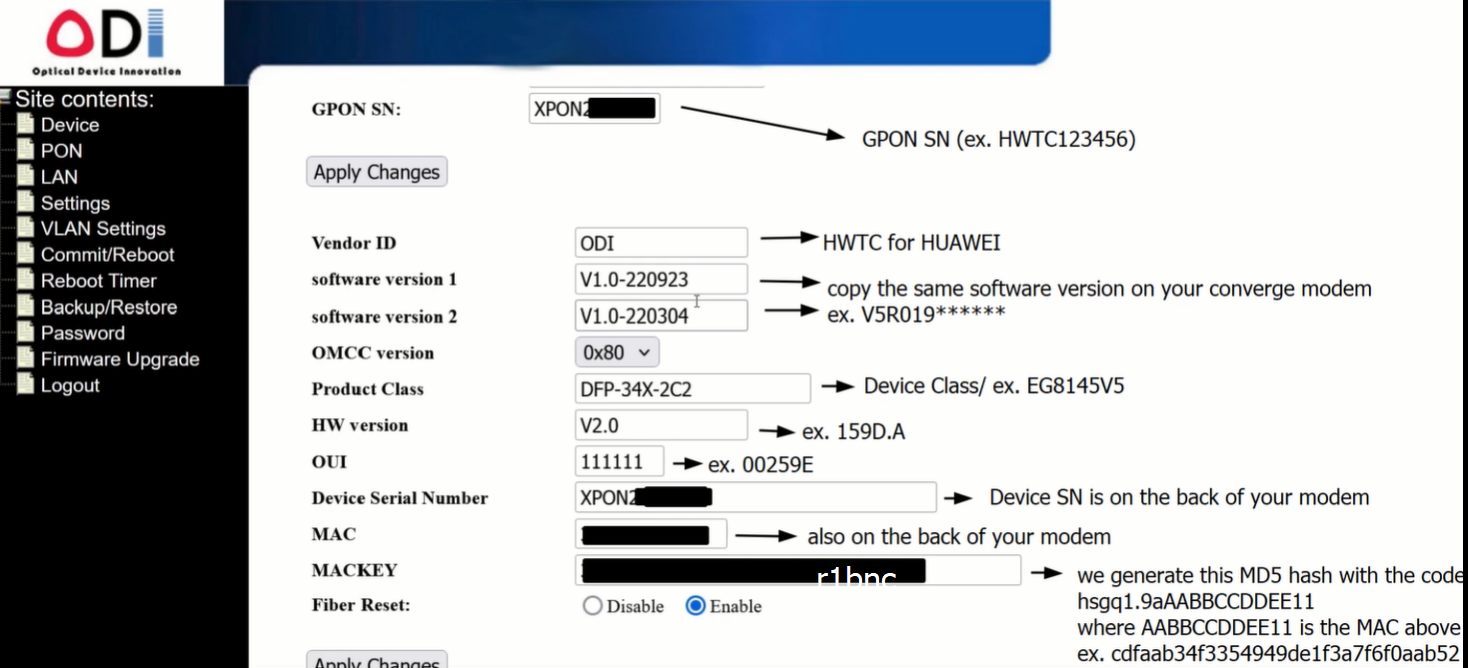
For the MAC_KEY, it is generated with the following: MD5 hash of hsgq1.9a[MAC Address of the ONT].
Sample MAC: AABBCCDDEE11, replace this with your own.
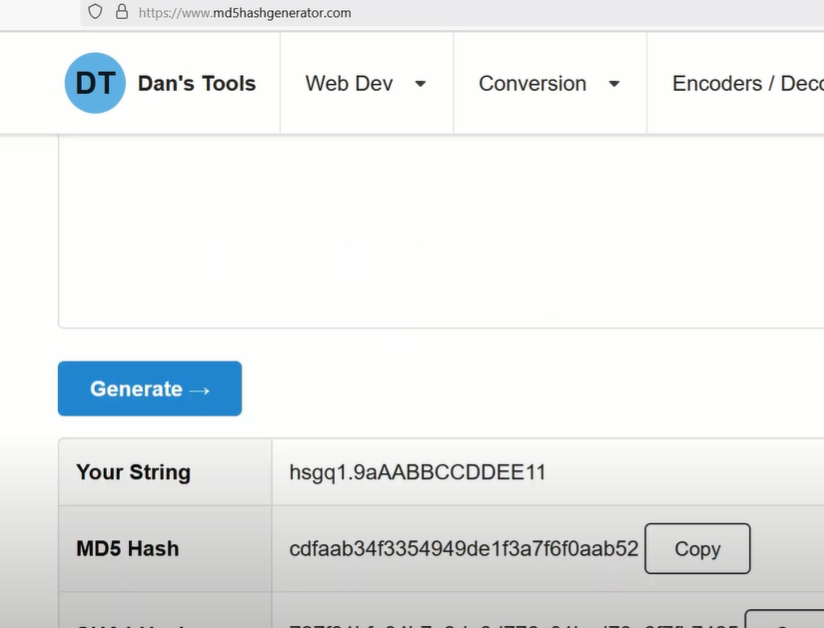
To generate the value of MAC_KEY, we can paste this inside the telnet of the stick or use an MD5 generator website.
echo -n "hsgq1.9aAABBCCDDEE11" | md5sum
Sample output: cdfaab34f33354949de1f3a7f6f0aab52
If you don’t want to use the web interface in configuring the stick, you can just log in via SSH or telnet and execute the command below:
flash set GPON_SN HWTC123456

flash set GPON_ONU_MODEL EG8145V5
flash set PON_VENDOR_ID HWTC
flash set OMCI_SW_VER1 V5R019******
flash set OMCI_SW_VER2 V5R019******
flash set CUSTOM_OMCI_SW_VER1 V5R019******
flash set CUSTOM_OMCI_SW_VER2 V5R019******

flash set HW_HWVER 159D.A
flash set ELAN_MAC_ADDR AABBCCDDEE11
flash set VS_AUTH_KEY cdfaab34f33354949de1f3a7f6f0aab52

flash set OMCI_FAKE_OK 1
flash set OMCI_OLT_MODE 3
Be sure to restart the device after making changes.
We now need to configure VLAN setting of our ODI Stick, I configured it below:
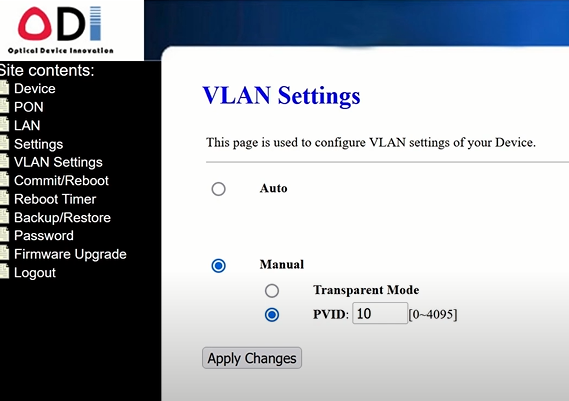
I did not want to configure VLAN on my 3rd party router, so I configured it ‘Manual’ and set the ‘PVID’ to 10. This will give me a bridge connection to my ISP network.
You can check my Bridging Converge video for clarifications:
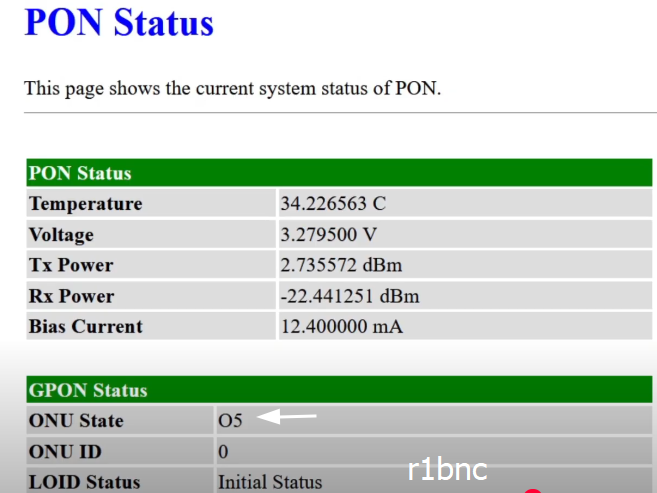
After the configuration, plug in the fiber cable from the ISP to the ODI SFP stick. Visit back the web dashboard, and you should see that we have an O5 (authenticated) state:
The screenshot above shows that we have O5 status.
We can also see the temperature of the stick; be sure to keep it below 70 Celsius (add a fan), the RX Optical power should also be around between -8 and -27 dBm to get a good internet connection.
Bridging Settings
Refer to the diagram below for the bridging:
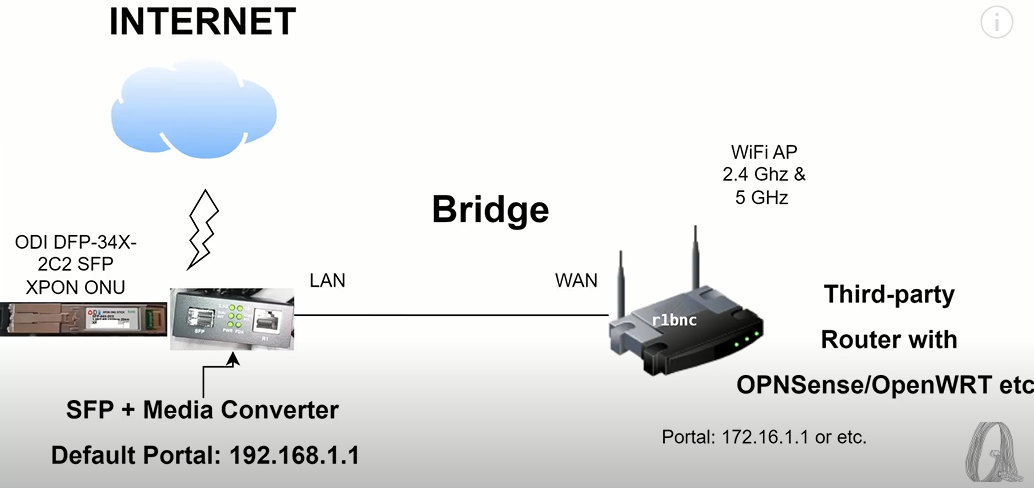
Unplug the media converter from your PC or laptop and plug it to your 3rd party router’s WAN port.
In this example, I use OPNsense and it automatically detected link from the media converter.

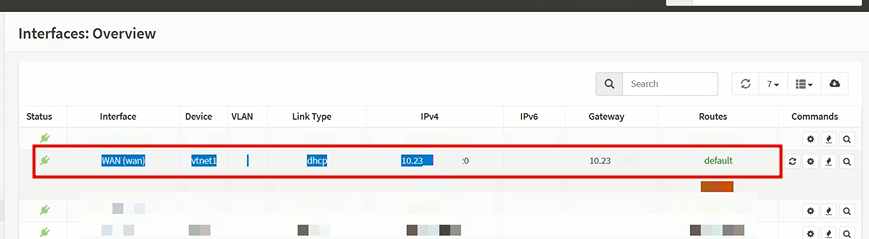
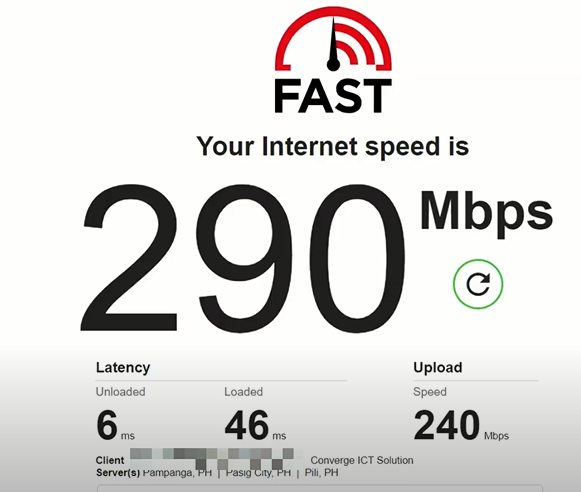
We get the 10.23.X.X IP from the ISP, which means we have completed the configuration and bridging. Time to test the internet speed.
If you notice, we are now unable to access the ODI Web interface after bridging it. To access it back, you can disconnect it from your 3rd party router and plug it back to your PC or laptop, then set the static IP that we did earlier, or you can configure your 3rd party router, so we could access the web interface without unplugging the cable.
If you are using OPNSense there is a quick guide that enables us to access bridged modems (external link): **https://forum.opnsense.org/index.php?topic=36936.0**
Please check my Youtube video for this guide, published Jan 11, 2025:
Don’t forget to like, share and subscribe and comment down on the video!
Music by Kevin MacLeod
For donation: https://ganknow.com/r1bnc
Errata: N/A
gpon #xpon #hsgq #huawei #converge #opnsense #openwrt #sfp #fiber #apc #upc #bridge #wifi #router #modem #eg8145v5 #vlan #networking #internet #isp #ont #onu #optical #realtek #backspace #discord #8311 #bell #module #media #converter #gigabit #r1bnc #anime4000 #bypass
Except where otherwise noted, this work is licensed under Creative Commons Attribution-ShareAlike 4.0 International License (http://creativecommons.org/licenses/by-sa/4.0/).