July 29, 2022, 1:16 a.m.
Dumping and Restoring Stock Firmware of ZTE MF286RA (Method 2)
Video showing dumping of firmware:
Please refer to my other post on how to setup the CP2102 on ZTE MF286RA: https://r1bnc.eu.org/post/83/
This assumes that your ZTE MF286RA is using the Globe Stock firmware.
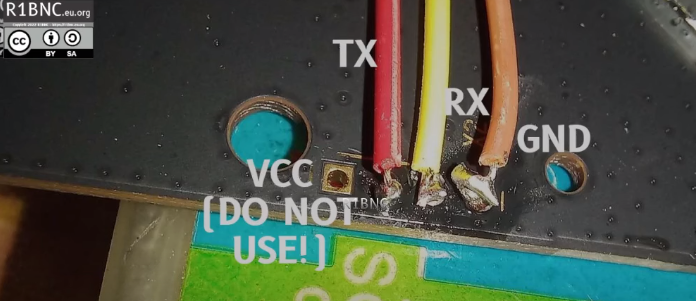
We plug in our ZTE MF286RA UART port to our CP2102:
Commands to dump firmware (METHOD 2):
tftp -l /dev/mtd0ro -r mtd0ro_uboot.img -p 192.168.254.100
tftp -l /dev/mtd1ro -r mtd1ro_uenv.img -p 192.168.254.100
tftp -l /dev/mtd2ro -r mtd2ro_reservd1.img -p 192.168.254.100
tftp -l /dev/mtd3ro -r mtd3ro_fota-flag.img -p 192.168.254.100
tftp -l /dev/mtd4ro -r mtd4ro_art.img -p 192.168.254.100
tftp -l /dev/mtd5ro -r mtd5ro_mac.img -p 192.168.254.100
tftp -l /dev/mtd6ro -r mtd6ro_reserve2.img -p 192.168.254.100
tftp -l /dev/mtd7ro -r mtd7ro_cfg_param.img -p 192.168.254.100
tftp -l /dev/mtd8ro -r mtd8ro_log.img -p 192.168.254.100
tftp -l /dev/mtd9ro -r mtd9ro_oops.img -p 192.168.254.100
tftp -l /dev/mtd10ro -r mtd10ro_reserved3.img -p 192.168.254.100
tftp -l /dev/mtd11ro -r mtd11ro_web.img -p 192.168.254.100
tftp -l /dev/mtd12ro -r mtd12ro_kernel.img -p 192.168.254.100
tftp -l /dev/mtd13ro -r mtd13ro_rootfs.img -p 192.168.254.100
tftp -l /dev/mtd14ro -r mtd14ro_data.img -p 192.168.254.100
tftp -l /dev/mtd15ro -r mtd15ro_fota.img -p 192.168.254.100
tftp -l /dev/mtd16ro -r mtd16ro_firmware.img -p 192.168.254.100
We only need the web, kernel and rootfs but it is better to get all partition backups.
Replace the IP address to your PC/Laptop IP Address like on my previous post involving tftpd64.
The Dumped Firmware images (METHOD 2):
mtd0ro_uboot.img       mtd12ro_kernel.img  mtd15ro_fota.img      mtd2ro_reservd1.img   mtd5ro_mac.img        mtd8ro_log.img
mtd10ro_reserved3.img  mtd13ro_rootfs.img  mtd16ro_firmware.img  mtd3ro_fota-flag.img  mtd6ro_reserve2.img   mtd9ro_oops.img
mtd11ro_web.img        mtd14ro_data.img    mtd1ro_uenv.img       mtd4ro_art.img        mtd7ro_cfg_param.img
Assemble the image (Done with GNU/Linux Operating System, on windows you can download busybox and use that ):
Clue: Just concatenate web, kernel and rootfs into one file called root_uImage.
$ cat mtd11ro_web.img mtd12ro_kernel.img mtd13ro_rootfs.img > root_uImage
$ ls -lh|grep root_uImage
-rw-r--r-- 1 user user  37M Jul 28 16:35 root_uImage
Using your CP2102, power off the device, plug in the LAN cable to our PC/Laptop. Power on then interrupt u-boot by pressing any key.
Set up tftpd server and place the downloaded bin to the same folder. (You may refer to my ZLT S10 video on how to use tftpd64 )
You should get the following output:
U-Boot 1.1.4 (Jun  8 2021 - 23:42:27)

ap152 - Dragonfly 1.0DRAM:

...
ZTE_InitFotaFlashPara: nand_curr_device=0
zte_getHandOffState: read data=0xff from 0x0
Hit any key to stop autoboot:  2
After hitting any key, uboot should now stop. We now need to start the tftpd64 server on our PC.
Set your PC/Laptop’s static IP to:
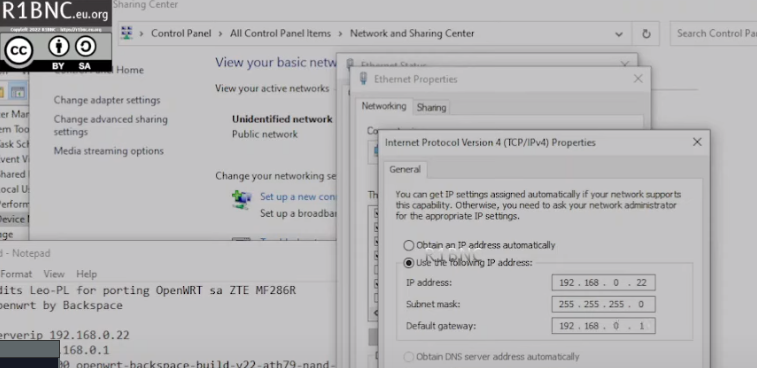
Copy and paste the following command
tftp 0x80060000 ${dir}root_uImage
You should get an output similar to this:
TFTP from server 192.168.0.22; our IP address is 192.168.0.1
Filename 'root_uImage'.
Load address: 0x80060000
Loading: *^HT #################################################################
         #################################################################
         #################################################################
...
done
After the root_uImage has been downloaded we are now ready to restore the stock Globe firmware using these commands:
nand erase 0x1000000 0x800000 &&nand write_partition 0x80060000 0x1000000 0x800000 &&nand erase 0x1B00000 0x1A00000 &&nand write_partition 0x80b60000 0x1B00000 0x1A00000 &&nand erase 0x1800000 0x300000 &&nand write_partition 0x80860000 0x1800000 0x300000
Sample output:
NAND erase: device 0 offset 0x1000000, size 0x800000
OK

NAND device write_partition offset 0x1000000, size 0x800000
 nand_write block_count =0x40,ret_size=0x0
nand write_partition ok

NAND erase: device 0 offset 0x1b00000, size 0x1a00000
OK

NAND device write_partition offset 0x1b00000, size 0x1a00000
 nand_write block_count =0xd0,ret_size=0x0
nand write_partition ok

NAND erase: device 0 offset 0x1800000, size 0x300000
OK

NAND device write_partition offset 0x1800000, size 0x300000
 nand_write block_count =0x18,ret_size=0x0
nand write_partition ok
Power off the device then power on, you should now be back to the Globe Stock Firmware. The configuration should also be reset.
Full credits to Lech Perczak for the backup/restore hints and for porting OpenWRT to ZTE MF286R/D/A
Full credits to R1BNC and Backspace Team (Discord)
Donation to R1BNC (optional, will be used for buying modems for research):
Donation:
Bitcoin: 3MrTFjt3YdA1yi8n4dNTCBUeUDFiVkpDE4
XRP: rU2mEJSLqBRkYLVTv55rFTgQajkLTnT6mA Tag: 990928
Except where otherwise noted, this work is licensed under a Creative Commons Attribution-NonCommercial-ShareAlike 4.0 International License (http://creativecommons.org/licenses/by-nc-sa/4.0/).